


 i-CareU Life
-
Q1: How to reset your Q-Band device?
A1:
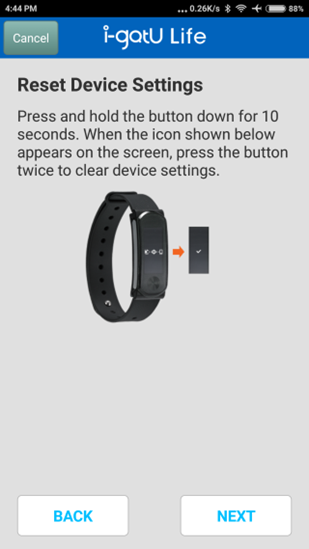
1. Please press and hold the button for 12~15 seconds, the Q-Band device will show the icon in the display screen below.
Note: If your Q-Band device does not show the icon, please try the step again.

2. When you see the disconnection icon is shown on the Q-Band device, please tap the button twice, the Q-Band device will show the icon in the display screen below.

3. After reset your Q-Band device, then it will clear the BLE settings, so you have to pair and connect with it again.
Please open i-gotU Life app on your phone, then select “Settings” > “Setup New Device” > “No. Not first time” ,
and follow the Installation Wizard to establish the connection between Q-Band device and your phone.You also can refer to the video to reset your Q-Band device : https://youtu.be/XtMXHH5SoeU
-
Q2: Can I wear i-gotU Smart Wristband to swim or take a shower?
A2:
i-gotU Smart Wristband/Watch is water resistance to IPX7 (IEC standard 60529), which means it is rain-proof, splash-proof, and sweat-proof. It CANNOT withstand the force is associated with water jet and swimming.
Take off your i-gotU smart wristband/watch before you engage the following activities:
1. Showering or bathing: Pressurized or high velocity water jet may penetrate into the device. Thermal expansion/contraction would also be harmful to it.
2. Swimming: At least to IPX8 water resistance or you cannot swim with it.
3. Sauna or steam room: i-gotU Smart Wristband/Watch operates at -10°C~+50°C. High temperature and steam may cause the device damaged.Whenever you get your wristband/watch wet, dry it thoroughly before putting it back on.
-
Q3: Explanation of BLE diconnection between Q-68HR and phone
A3:
(1) The transmission range of Wi-Fi straight unobstructed is 100 meters. However, due to the specification of low power consumption, the transmission range of Bluetooth straight unobstructed is only 10 meters. It’s 10 times shorter. Same as the reason in the building, the transmission range of Wi-Fi is usually less than 100 meters. Moreover, due to human body could block most radio waves, the distance of Bluetooth Wearable device would be change by the angle of mobile phone and body. And it is usually less than 10 meters.
The actual test result demonstrated the transmission range of Q-Band in the open and "straight unobstructed” environment can be reached around 20 meters. It is compliant with the BLE specification. But if it was blocked by a wall or other obstacles (put it in a wallet, clothing and pants pocket, motorcycle glove compartment…etc.), or phone Bluetooth reception is poor, it will reduce the transmission distance, even disconnect.
(2) For overcoming occasional disconnection, i-gotU Life App will constantly try to connect with Q-Band after disconnecting. And Q-Band will receive Disconnection Alert when you exceed the receiving range. As long as you are close to your phone,, Q-Band will be automatically connected. You do not need to connect manually, and it will not affect user’s notification with incoming calls, messages. Moreover, Disconnection Alert function is used to remind users for checking whether their phone is nearby. If you think Disconnection Alert will disturb you, we recommend you to disable the Disconnection Alert function.
(3) There are two situations which might make the App cannot be reconnected after disconnection. One is that if you put your Q-Band on the table and do not touch it, and after 30 seconds you took away your phone out of there, it will get into “Super Power Saving Mode”. At this time, BLE of Q-Band will disable automatically and unable to reconnect with App. You just move Q-Band, BLE of Q-Band will enable immediately.
Second is that when your Q-Band disconnected with Android phone over 30 minutes (do not use it), the phone system might get into “Deep Sleep Mode” and then froze all Apps in executed. At this time, it will keep disconnecting until you unlock your phone screen or any incoming call/message makes phone screen unlocked, phone system would be awakened and started to connect.(4) If your Q-Band was connected occasionally or even disconnected completely , and it is not belong to above situation, please follow the procedures below:
1. Please restart your phone.
2. Reset your Q-Band, please refer to the link below:
http://global.mobileaction.com/support/sub-Q-68/F2-13.htm(5) If you still have the same problem after doing above, please try another phone to test. If it's normal when you connect your Q-Band with another phone, it might be due to the unstable BLE connection of the original phone. You can try to restart the phone again or ask your phone manufacture for whether there is any new system upgrade solution to improve the unstable BLE connection.
-
Q4: Why my Q-Band device always show ”Run APP to setup” after it failed to upgrade the firmware?
A4:
When you first time to install or upgrade the new firmware, phone Bluetooth disconnect suddenly or battery low might cause firmware upgrade failed.
At this time, Q-Band device will only show [Run APP to setup] due to the incomplete installation of firmware upgrade.● First time install the Q-Band device, please refer to the steps below:
1. Restart your phone.
2. Enable your phone Bluetooth setting, and remove all paired devices.
3. Update i-gotU Life app to the latest version, then open the i-gotU Life app and select "Yes,First time" to connect Q-Band device.
4. If your Q-Band device still cannot connect with your phone, please uninstall the i-gotU Life app, and reinstall the i-gotU Life,
and then select "Yes, First time", then following the installation wizard to connect Q-Band device.If you can access the App, please tap the icon at top left corner:
 Home, > Settings > Change Device Language you need.
Then i-gotU Life will download firmware again and install on Q-Band device. After changing language successfully, you can see the time display on your Q-Band device.● Not first time, the i-gotU Life appeared "Failed to update device" when you activate firmware update manually:
If i-gotU Life has appeared "Connected" on the upper left corner of the software, please tap
[Home] > [Setup] > [Change Device Language],
then select the same language to reinstall the device firmware.
If i-gotU Life appeared "Disconnect" on the upper left corner of the software, please tap[Home] > [Setup] > [Setup New Device] to reinstall the device firmware.Note:
1. If i-gotU Life cannot find the Q-Band device, please try to reset the Q-Band device, please refer to the FAQ > Q1 to reset your Q-band device.
2. If your Android phone version is 6.0, please make sure you have enable the Location(GPS) function.After updated the firmware version, if the Q-Band device still appear "Run APP to setup",
please tap[Home] > [Setup] > [Change Device Language], then select the same language to reinstall the device firmware.
-
Q5: Why there is no sleep record?
A5:
If you want to record your sleep data, you must switch to Sleep mode on your Q-Band device when you are going to sleep.
There are two ways to switch your Q-Band device to Sleep mode:1). Manual Switch to Sleep mode:
1. Please long-press the button on the Q-Band device until you see 4 icons on the screen for mode selection.
2. Tap the button twice to select Sleep mode” (moon icon) and leave the button. After vibrating once, your Q-Band device will switch to Sleep mode.
When you get up after, please switch your Q-Band device to Daily mode to stopping record sleep.2). Auto Sleep:
If you have a regular sleep time, we recommend you to enable Device Auto Sleep function. You do not need to manually switch to Sleep mode.
Please refer to the link below for more information:
http://www.mobileaction.com/support/sub-Q-68/F2-3.htmIn "Sleep" mode, the Q-Band device will close the BLE connection. Until you switch to "Daily mode" and make the connection between smart phone and Q-Band device,
the sleeping pattern data will be downloaded from Q-Band device, and then i-gotU Life app will analysis your sleeping pattern.
If you still have not seen your sleeping pattern, please try to click the sync icon on the upper left corner of the software to download your Q-Band device data.

-
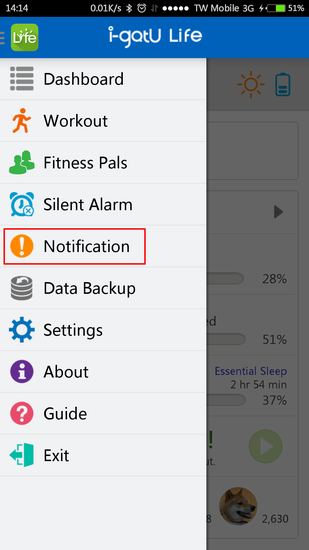
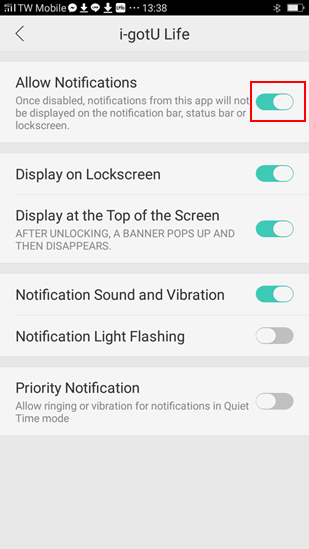
Q6: How to set notification of incoming calls, SMS, E-Mail, or alerts from the social apps?
A6:
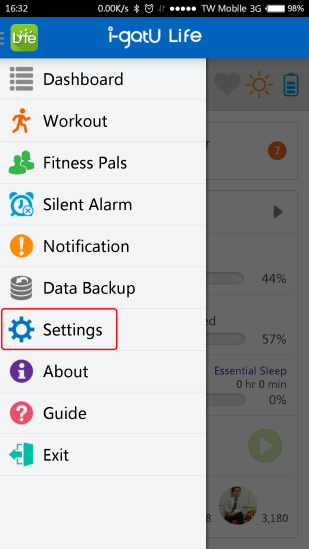
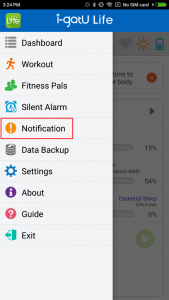
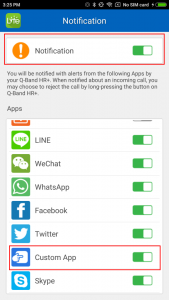
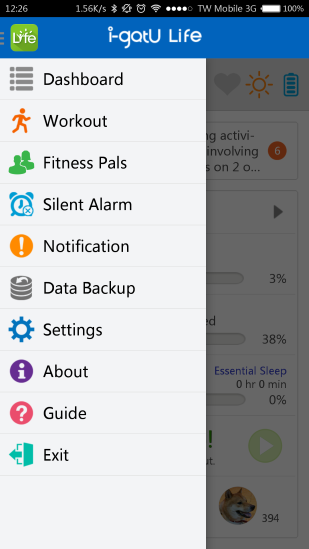
1). Please tap “Menu” of the i-gotU Life (on the left top), and then tap “Notification”.
2). When you get into the setting of “Notification”and enable this function, the Android phone will appear a tip to ask you to follow the procedure to enable Notification for i-gotU Life Service.
If you are using iPhone, please skip to step4.
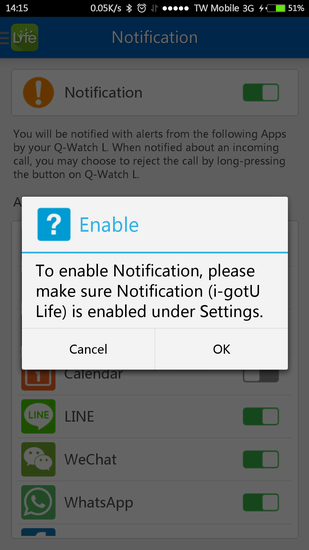
3). Please tap "OK" to enable Notification function, and follow the procedure to allow the Notification access Service.
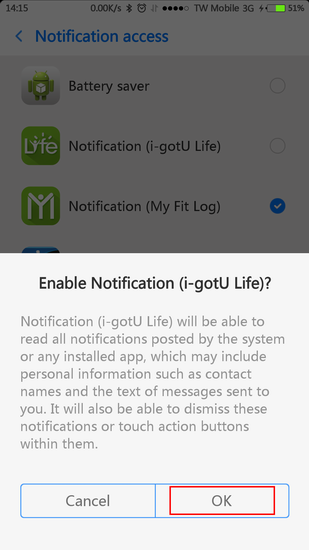
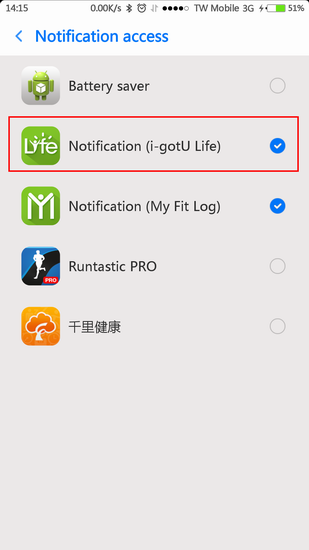
4). After you enable i-gotU Notification Service, please go back to the setting of Notification”.
Select the programs that you need to be notified, and tap “back” to the main display.
-
Q7: How to re-connect with Q-Band device when I change to another phone OS?
A7:
When you change your phone from Android phone to iPhone or iPhone to Android phone, you have to turn off the bluetooth of old phone first.
Please open i-gotU Life app and tap "No, Not first time" to proceed the installationNote: It will delete your phone Bluetooth record and reset your Q-Band device in this installation process. Please must execute the whole process.
Then, please refer to the link below for the complete installation instruction ( Continue to Step 5 ) :
For Android user:http://www.mobileaction.com/support/sub-Q-68/Q68_connection.Android.htm
For iPhone user: http://www.mobileaction.com/support/sub-Q-68/Q68_connection.iOS.htm
-
Q8: How to turn on screen by gesture?
A8:
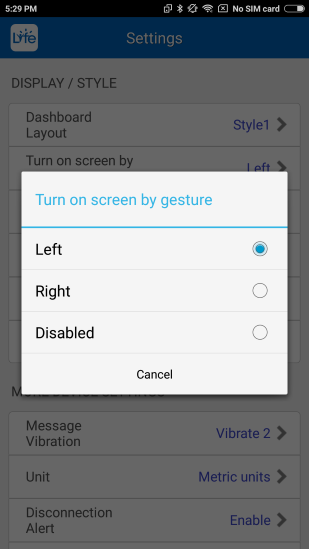
1. Please tap“Menu” of the i-gotU Life (on the left top), and then tap“Settings” >“Turn on screen by gesture” under MORE DEVICE SETTINGS.
Then select the Q-Band to be worn on your left or right wrist.
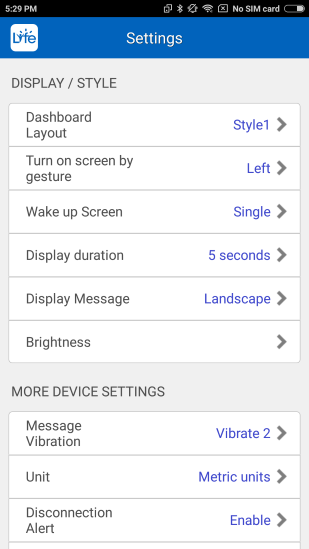
2. Make sure the Q-68HR is worn correctly on either your left or right wrist as illustrated.
Gesture sensing might be affected if you rewearing the Q-Band inappropriately.
After that, please tap “Sync” on the right top icon to sync the setting with your Q-Band .
3. After raising your Q-68HR, you must reverse its screen to show the display (around 90 degree). if you are wearing on the left hand, please do reverse clockwise from outside to the front of your eyes after raising your left hand.
You might refer to our video for the detail: https://youtu.be/UTOPNbKFjJQ 。
-
Q9: Why Q-Band device cannot connect with my phone?
A9:
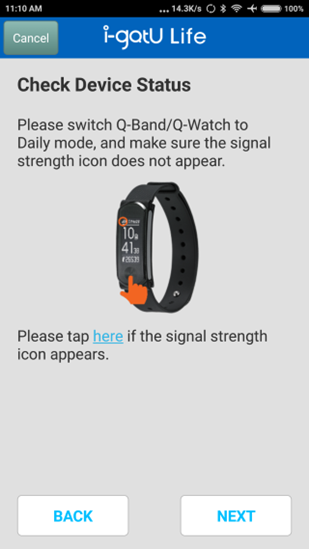
1. Please make sure the current mode of your Q-Band device. Only Daily and Sports mode can connect with your phone.
The other mode will NOT connect: Sleep, Nap and charging mode.2. Please refer to the following steps to connect your Q-Band device.
Step1. Please go to Bluetooth setting on your phone, and clear all paired Bluetooth devices.
(ex: Bluetooth Headset, Bluetooth Speaker, include Q-Band wristband), then restart your phone.If you are using the iPhone, please try the followings to delete the Bluetooth pairing.
1. Open the [Settings] app in your iPhone, then go to [Bluetooth].
2. Locate the device name [Q-68HR is Wristband HR+, Q-69HR is Wristband HR3] and tap on the (i) button next to the name.
3. Tap on [Forget This Device] to remove the device.Step2. Please reset the Q-Band device.
Please refer to below link. http://global.mobileaction.com/support/sub-Q-68/F2-13.htm.
Note: If your are using the iPhone and iOS version is 13 and above, please skip this step.Step3. Open i-gotU Life app, tap the Life icon on upper left corner, select [Settings]→[Setup New Device]→[Yes, First time],
then follow the procedure on the screen to finish setup. Please refer to below link.
http://global.mobileaction.com/support/sub-Q-68/F1-1.htmNotice: For iOS system version 13 above, on your iPhone, please tap [Settings] > [Privacy] > [Bluetooth] to make sure the i-gotU Life app has been enabled.
Step4. After finishing the setting, the main screen on i-gotU Life app will appear “Connected”.
-
Q10: Android 8.0 phone often disconnect with Q-Band device or appear the notification failure message?
A10:
If your Android 8.0 phone often disconnect with Q-Band device or i-gotU Life pop up the notification failure message, please refer to the following steps to set your phone.
Asus (Android 8.0):
1. Settings → Battery → PowerMaster → Auto-start manager→ Allow i-gotU Life to the permission list.
2. Settings → Battery → PowerMaster → Battery modes → Set to the Normal mode.
3. If the disconnection message still pop up to notify you, please open i-gotU Life app → Menu → Notification → Enable Notification and custom apps → Check asus smartphone's Setting → Apps&Notification → Notification → Enable i-gotU Life app's notification.
4. Open asus smartphone 's program(Mobile Manager) → Tap the upper right selection → Settings → Turn off [Clean up in suspend] function.
5. Restart your smartphone.Samsung(Android 8.0):
1. Open i-gotU Life → menu → Notification → Custom App, then enable the Custom App, and select the i-gotU Life App.
2. Check your phone, go to Settings → Apps → more → Special access → Notification access, and enable i-gotU Life.
3. Check your phone, go to Settings → Device maintenance → Battery, disable Power Saving Mode.
4. Restart your smartphone.PS: If you still cannot solve the problem when you have finished the steps above. Please remove the i-gotU Life, and reinstall it.
Huawei(Android 8.0):
1. Open i-gotU Life App → menu → Notification → Custom App, then enable the Custom App, and select the i-gotU Life App.
2. Settings → Battery → disable the Power Saving mode.
3. Settings → Battery → Launch → Manage batch manually → select the i-gotU Life app and allow the all options.
4. Settings → Advanced settings → Battery manager → Protected apps, please enable the i-gotU Life app.
5. Restart your smartphone.Other Brand phones:
1. Open i-gotU Life App → menu → Notification → Custom App, then enable the Custom App, and select the i-gotU Life App.
2. Please go to the Auto-start manager function, then add the i-gotU Life App.
3. Please go to the Background program manager function, then set the i-gotU Life that does not add to Background program manager.
4. Please go to Settings → Battery, disable the power saving function.
-
Q11: Why the i-gotU Life app appear Notification problem message?
A11:
Due to some Android phones have added the performance adjusting program, even the i-gotU Life app has added to the [Notification access], it still pop up the message of Notification problem. Please refer to the following steps to solve problem.
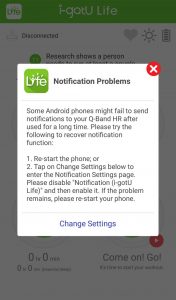
1. Please add the i-gotU Life app to [Auto start] list.
2. Please lock your i-gotU Life app, if your smartphone has supported the lock app function.
3. Please turn off the Battery Saving function. Battery saving function may force to close Bluetooth function or shut down the i-gotU Life app.
4. Please open the i-gotU Life App, then go to [Notification] > [Custom App], check the i-gotU Life whether it has been selected.
-
Q12: Why my Q-Band will still increase calories even when I don’t wear it?
A12:
We adopt BMR (Basal Metabolic Rate) and plus the calories of extra activities to calculate the calories consumption. BMR (Basal Metabolic Rate) is according to the PROFILE that you wrote (Gender, Age, Height, and Weight).
When you are not wearing, or not moving the Q-Band device, it will use BMR (Basal Metabolic Rate) to calculate your calorie consumption. So you will see almost the same calorie consumption in the timeline of the Calorie chart.
When you do some exercises, our program will calculate the calories according to the speed detected by the motion sensor in your Q-Band device.
Generally speaking, the faster detection, the higher calories.
-
Q13: My iPhone has enabled the Notification function of i-gotU Life, but my Q-Band device does not receive the message notification?
A13:
1). iOS device has been supported to disable the application message notification , so if your Q-Band device does not receive the message notification via iPhone,
please tap [Settings] > [Notifications] on your iPhone, then select app and enable the [Allow Notifications] option.2). Please go to phone settings > Battery, disable the [Low Power Mode] option.
3). Please clear all notifications in the Notification bar, then restart your phone.
4). If your iPhone is iOS 13, on your iPhone, please tap [Settings] > [Bluetooth], there is a device name [Q-Band xx] under MY DEVICES, please enable [Share System Notifications] option.
-
Q14: Why Q-Band cannot detect sleep pattern and quality automatically?
A14:
Sleep pattern and quality is detected by the vibration extent and frequency of Q-Band device. Then it will show the different phases according to the above detection: Awake, Light sleep, Deep sleep and REM (dreaming).
If sleep status is just detected when Q-Band device is stationary or less movement, inaccuracy would be increased. So we let user manually switch to sleep mode or set [Auto Sleep] function under setting of the App.
-
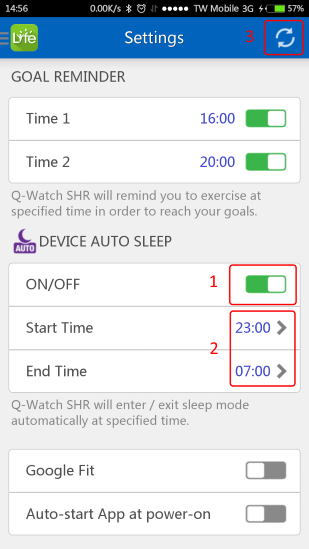
Q15: How to set Auto Sleep mode on your Q-Band device?
A15:
1). Please tap “Menu” of the i-gotU Life (on the left top), and then tap “Settings > DEVICE AUTO SLEEP” to do the time setting.
2). Please enable the DEVICE AUTO SLEEP function, then tap Start Time” to set your sleep time and “tap End Time to set your get up time”.
After finishing the auto sleep setting, please tap the Sync button on the upper right corner to sync the setting to your Q-68HR.
The Q-Band device will automatically change to Sleep mode on your Start time, and change to Daily mode on your End Time.
-
Q16: What is the criteria of sleep pattern and quality?
A16:
After switching to “Sleep mode”, Q-Band will be based on the level of shaking, frequency, and duration of time to determine what is awake, light sleep, deep sleep or REM.
Please refer to the link below for the detailed REM explanation:
http://en.wikipedia.org/wiki/Rapid_eye_movement_sleep
-
Q17: How to calculate the “Essential Sleep” shown in the Sleep mode?
A17:
Essential Sleep = Deep sleep + REM
Please refer to the link below for the detailed REM explanation:
http://en.wikipedia.org/wiki/Rapid_eye_movement_sleep
-
Q18: How to shut down the power of Q-Band device?
A18:
Q-Band device is designed for 24 hours wearing. It has built-in saving power function, so it does not need to shut down the power.
-
Q19: What’s the battery life of Q-Band when it is fully charged?
A19:
Q-68/Q-68HR:
You can use Q-68/Q-68HR up to 10 days without charging with notification enabled and with heart rate detection on 2 hours per day in workout.Note:Q-68 doesn't support heart rate detection feature.
Q-69HR:
You can use Q-69HR up to 7 days without charging with notification enabled and disable heart rate detection. If you enable 24 hours continuously heart rate then you can use Q-69HR up to 5 days without charging.
-
Q20: How many days of records can be stored?
A20:
7 days.
It has Circular Logging function: Q-Band will keep on recording data even if the memory has reached its limits. When the memory is full, the oldest records will be overwritten.
-
Q21: Why is the distance under Sports Mode of Q-Band different from the actual distance?
A21:
The distance is calculated by "Steps x Step Length".
The steps on Q-Band is calculated 2 steps when your hand swing back and forth once, and the step distance is detected by the motion sensor according hand swing speed.
The faster you walk, the greater the lengths of your steps will be.However, it could be inaccurate for the number of steps and the step length due to the fact that everyone's positions differently while walking or running.
So the distance calculated by Q-Band will be different from the actual distance.If you want to get a more accurate distance, please enable the GPS of phone when you start the workout function.
The distance calculated by the GPS will be more accurate.
-
Q22: How to update the firmware of Q-Band device?
A22:
Q-Band device will automatically update online. When Q-Band device is connected with i-gotU Life in the first time, the app will detect the firmware of Q-Band device and update to the latest. Then the app will auto-detect the firmware once a week.
i-gotU Life also provide the manually update. Please tap [Menu] of the i-gotU Life (on the left top), and tap [About] > [Check Firmware Update] to update your firmware.
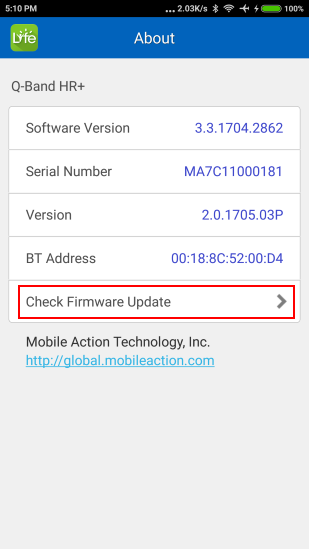
Note:
Please make sure the battery of Q-Band device is more than 3 grids before updating the firmware.
-
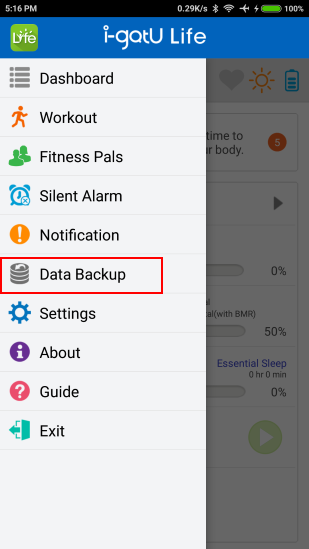
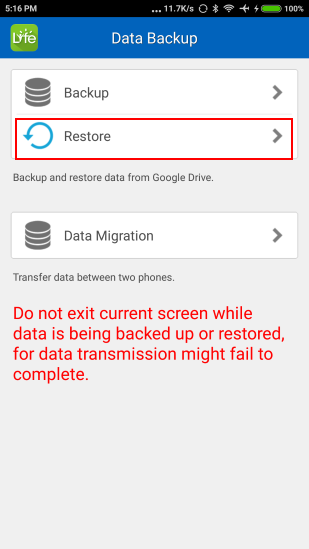
Q23: How to backup and restore the i-gotU Life App data?
A23:
The Q-68HR device can keep the recording data for 7 days, please regularly sync and download your Q-68HR device record,
and run Data Backup function to backup your data.
When you changed phone or removed the i-gotU Life app, you might run the Restore function to recover your data.Please refer to the following steps to backup and restore your i-gotU Life App data:
1. Please make sure Wi-Fi or 3G/4G network of your phone has been turned on.
2. Please tap “Menu” of the i-gotU Life (on the left top), and then tap “Settings > Data Backup” into the Data Backup function.
Please tap "Backup" to upload your data to Google Drive or iCloud.
Note: If your are using Android phone, the data will backup to Google Drive, if you are using iPhone, the data will backup to iCloud.

3. The existing data will be covered. Please make sure and tap "OK" button to backup your data.
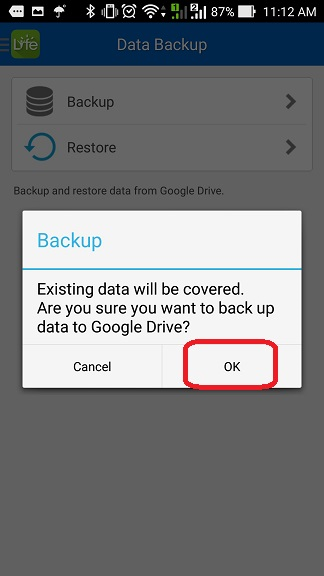
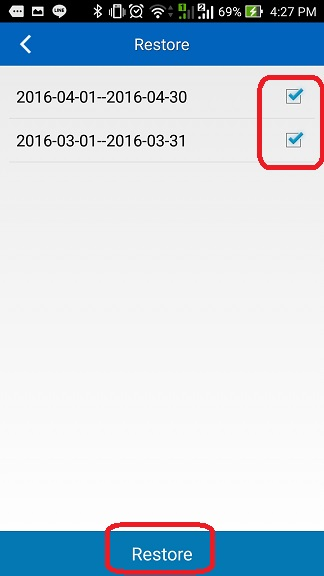
4. When you changed phone or removed i-gotU Life app, you might run the restore function to recover your data.
Please select the month that you want to recover, then tap "Restore" button to recover your data.
Note: The Google Drive data is only for Android phone, and the iCloud data is only for iPhone.
-
Q24: Why the i-gotU Life app pop up the notification problem message when I use the OPPO phone?
A24:
If you are using the OPPO phone, and you have enabled the notification setting,
but the i-gotU Life still shows the notification problem message, please refer to the following steps to check your phone settings.
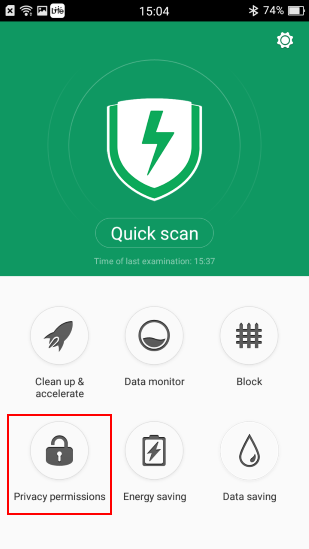
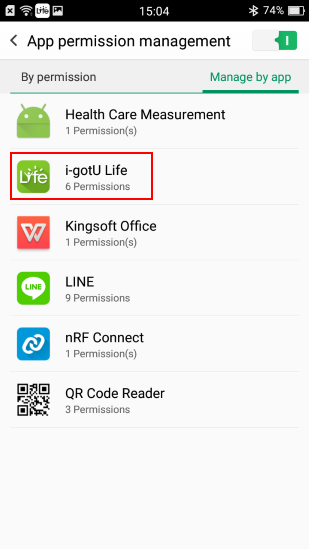
You have to check the ColorOS version in your OPPO phone, please go to [Settings] > [About phone] >[ColorOS version].
Step1.
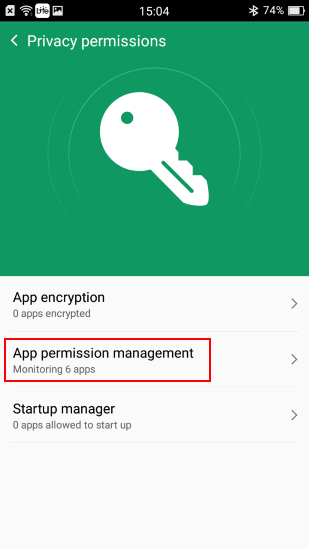
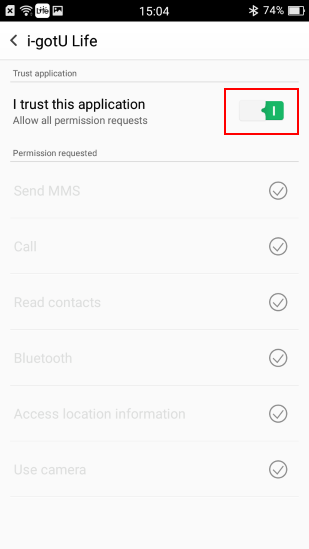
Go to [Security Center] > [Privacy permissions] > [App permission management], please switch to [Manage by app],
then select [i-gotU Life], and enable the option to trust the i-gotU Life app.
Step2.
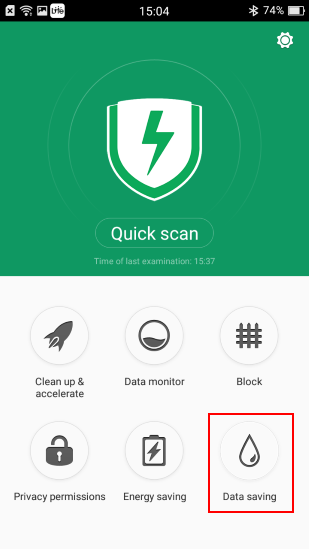
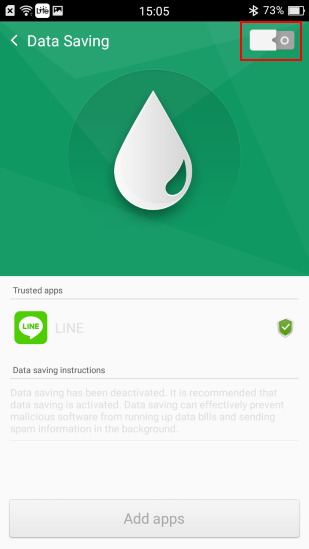
Go to [Security Center] > [Data saving], then disable the Data Saving option.
Notice: If you enable the Data Saving option, the phone bluetooth will be turn off.
Step3.
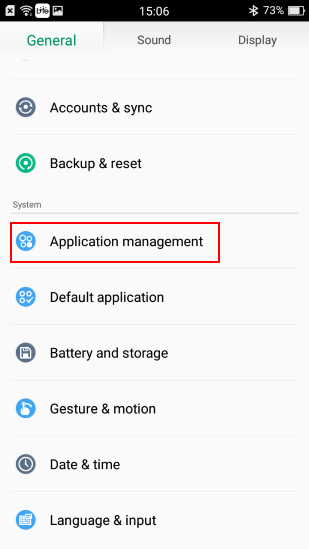
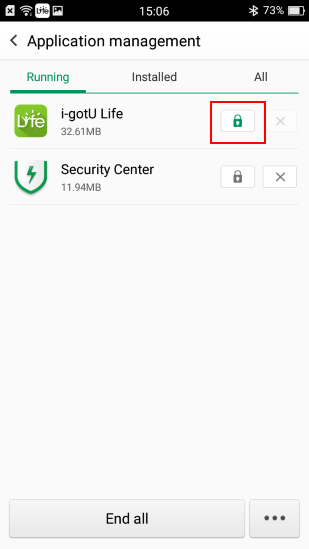
Go to [Settings] > [General] > [Application management], you will see the [i-gotU Life] in the Running list,
please tap the lock icon to lock this app.
Step1.
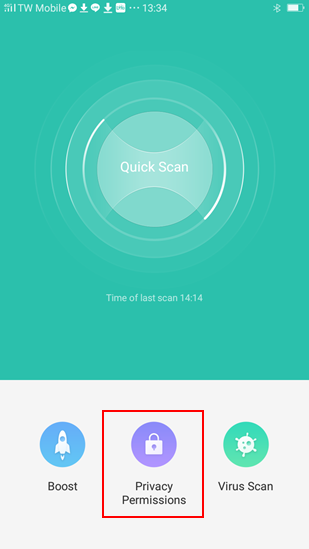
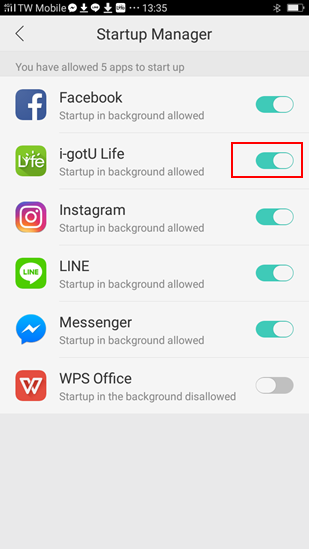
Go to [Security] (For ColorOS V3.1/3.2/5.0 , please go to [Phone Manager]) on your phone, and tap [Privacy permissions] > [Startup Manager], then enable i-gotU Life App.

Step2. ( If your ColorOS version is 3.1/3.2/5.0, please skip this step)
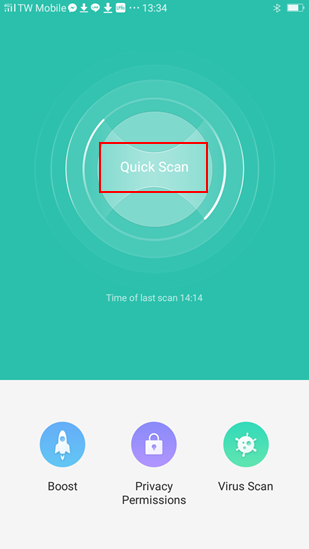
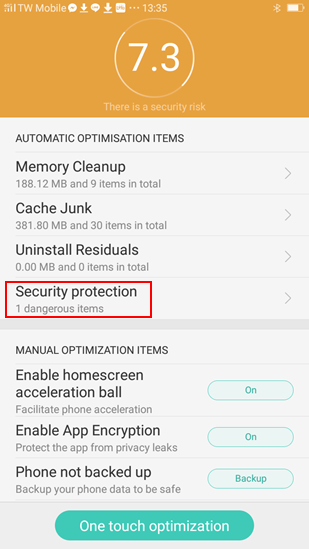
Go to [Security Center] on your phone, and tap [Quick scan] to scan your phone.
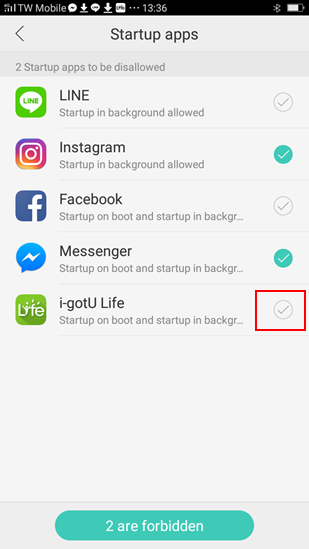
After scanning your phone, please tap [Security protection] > [(X)startup apps can be disallowed].
You will see the [i-gotU Life] in the startup apps list, please do not select the i-gotU Life app.
Step3.
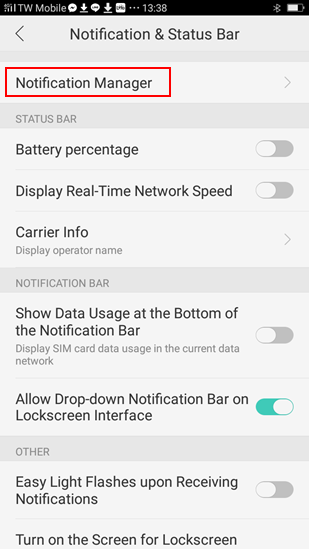
Go to [Settings] > [Notification & Status Bar] > [Notification manager], then select [i-gotU Life], and enable the option to allow the i-gotU Life app.

Step4.
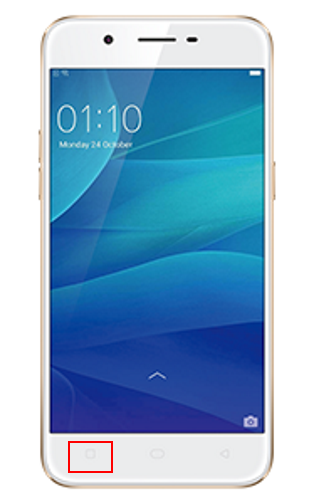
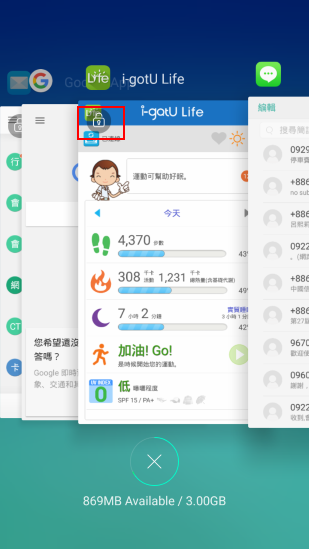
After starting the i-gotU Life app, then long press the Recents button to show the recent apps tray.
Please slide down the i-gotU Life app to lock it, so the i-gotU Life app could keep running in background without being cleared.
Step5.
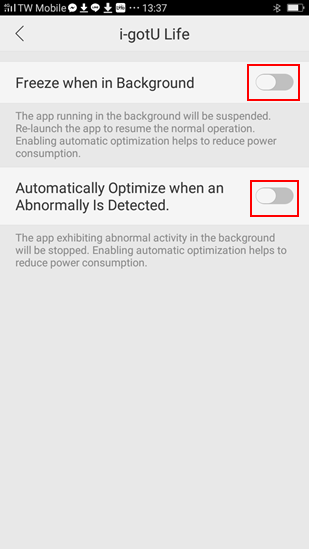
Go to [Settings] > [Battery] > [Others], (For ColorOS V3.1/3.2/5.0 , please go to [Energy Saver]), then select [i-gotU Life], and disable the [Freeze when in background] and [Automatically optimize when anomaly is detected].
-
Q25: How to set the Low Activity Alert function?
A25:
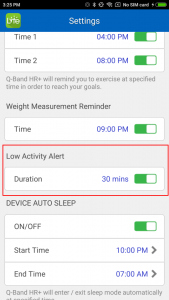
If you would like use the "Low Activity Alert" function, your Q-Band device need to be connected with your phone. When your Q-Band device does not transfer any step to your phone during your setting duration(30 minutes~120 minutes), the i-gotU Life App will transfer the low activity alert to your Q-Band device.
How to set the Low Activity Alert:
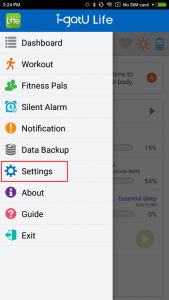
1. Please tap on "Home" > "Settings", then scroll down to the button of settings page and select "Low Activity Alert" function.
Enable "Low Activity Alert" function, then set the duration that you need.(30 minutes~120 minutes)。
2. Please tap on "Home" > "Notification", then enable the function.
Enable the "Custom App" option, then into the "Custom App" option to enable "i-gotU Life" app.Note: iOS system only need to enable the "Other App" option.

-
Q26: How to detect your “Resting Heart Rate”?
A26:
“Resting Heart Rate” is an important index for cardiovascular health, it's the heart rate which could be measured when you are awake, relaxed and inactive. It would be more accurate when you lie down to measure resting heart rate, we suggest you that switch the Q-Band device to "Sleep mode" before go to sleep, the Q-Band will automatically detect your resting heart rate.
Please refer to the following settings to enable the resting heart rate detection.
● Daily > [Auto Enable]
● Sleep/Nap > [Always on]
Note:
If you have set the [Device Auto Sleep] to detect your sleep status, the Q-Band heart rate detection function will be automatically turned on before 1 hour of the start time that you set.
-
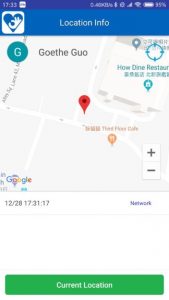
Q27: How to check cared one‘s “Location Info” ?
A27:
※Before activating i-CareU Life APP to check cared one's "Location Info" , please make sure that cared one’s smartphone has enabled Mobile Network or Wi-Fi、GPS function and i-gotU Life APP Data Authority options.
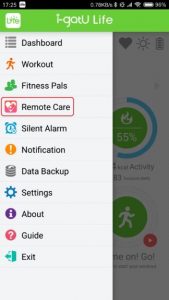
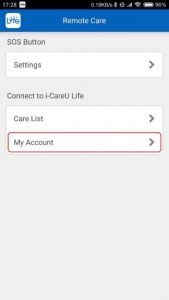
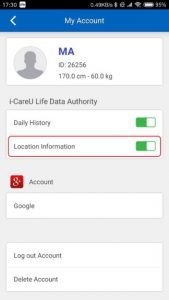
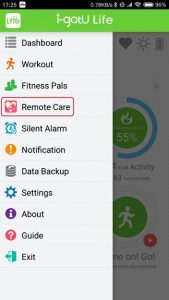
1.)Please activate cared one's i-gotU Life APP > Tap the life icon at the upper left corner to open function menu > [ Remote Care ] > [ My Account ] , enable the [ Location Information ] option to authorize i-CareU Life APP to check the data.
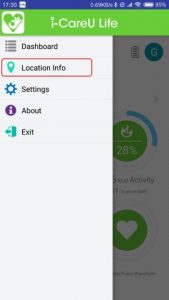
2.)Please activate i-CareU Life APP > Tap the heart icon at the upper left corner to open function menu > [Location Info] , then tap [Current Location] button.
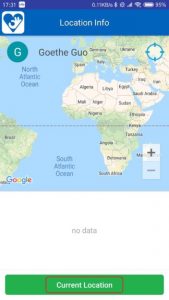
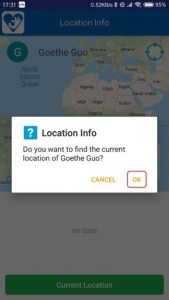
3.)Tap [ Ok ] when the Location Info request shows up > Finding location proceeding > Display the current location of cared one.(time and location)

-
Q28: How to enable SOS Button?
A28:
Please refer to the following steps and pictures:
Demo video: https://youtu.be/5WD6v2N2jgY
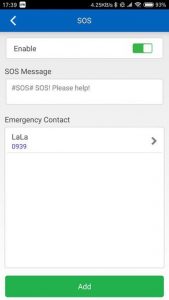
「Enable SOS Button option」
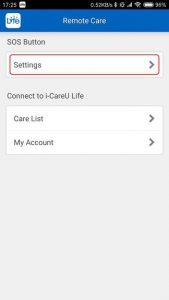
1.)Please activate i-gotU Life APP > Tap the life icon at the upper left corner to open function menu > [ Remote Care ] > SOS Button [ Settings ].

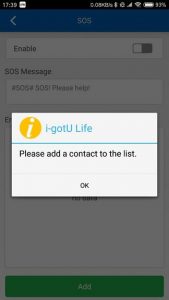
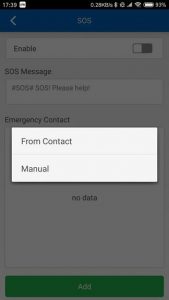
2.)Tap [ Add ] button to add Emergency Contact on the list ( You could choose to add Emergency Contact via smartphone’s [ Contact list ] or [ Manual ] input > When the message of “You can push the button on device 20 times to trigger an SOS ”shows up, tap [ OK ] to confirm that Emergency Contact has added successfully and SOS Button option has enabled.
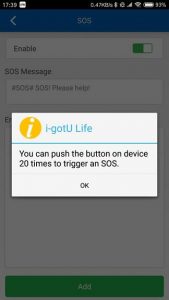
3.)then go to [ Dashboard ] to check that SOS icon has shown up or not. When SOS Button icon at the upper right corner has shown up, it means that SOS Button option has enabled successfully and completely on your Q-Band/Watch.
「Trigger SOS Button」
1.)When cared one encountering the emergency or falling down accidentally, tap the Q-Band/Watch button continuously to trigger SOS Button.
※You may disable SOS Button by long pressing the Q-Band/Watch button within 5 seconds.
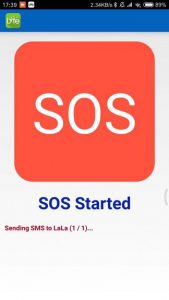
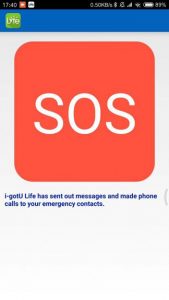
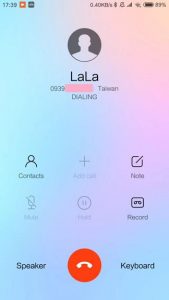
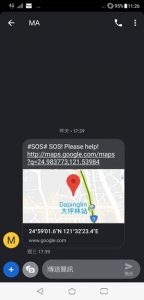
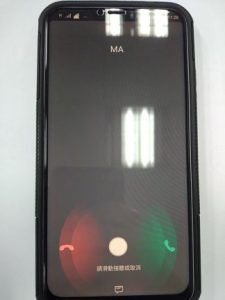
2.)Trigger SOS Button, i-gotU Life APP will automatically launch to send SOS message and call the Emergency contacts.
Notice:
Due to the permission issue of iOS system, the Q-Band/Q-Watch device does not support to remote control iPhone to send SMS and call automatically.
Please open i-gotU Life app on your iPhone and long press SOS button at the upper right corner to trigger SOS procedure, then manual to send SMS and call.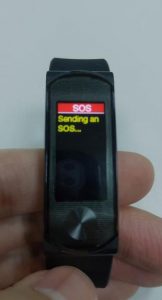
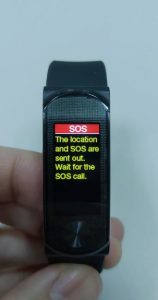
※ i-CareU Life APP will receive cared one’s SOS message and Location information which will show on i-CareU Life APP’s event simultaneously.

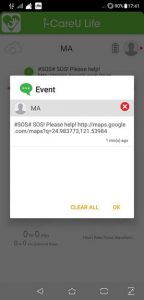
※Emergency Contacts who were added on i-gotU Life APP SOS Button will receive SOS SMS message and SOS call.
NOTE:
1.)Q-68HR version 3.3 and above、Q-69HR、Q-82、Q-90 support Remote Care and SOS button.
2.)You may disable SOS Button procedure by long pressing the Q-Band/Watch button within 5 seconds when SOS button is already triggered.
3.)Emergency Contacts of SOS Button could be added up to 6 people mobile phone number, when SOS Button has triggered for 5 seconds later, i-gotU Life APP will launch emergency SOS procedure, include sending SOS SMS message and calling the Emergency Contacts via phone. If there is no one answering SOS call and transferring the SOS call to voice mail, it will be considered as SOS call successfully and will not call the next Emergency Contact. i-gotU Life APP will also send SOS message and location information to caring family and friends who have bound to the Care List of i-CareU Life APP too.
4.)Due to the permission issue of iOS system, the Q-Band/Q-Watch device does not support to remote control iPhone to send SMS and call automatically.
Please open i-gotU Life app on your iPhone and long press SOS button at the upper right corner to trigger SOS procedure, then manual to send SMS and call.
-
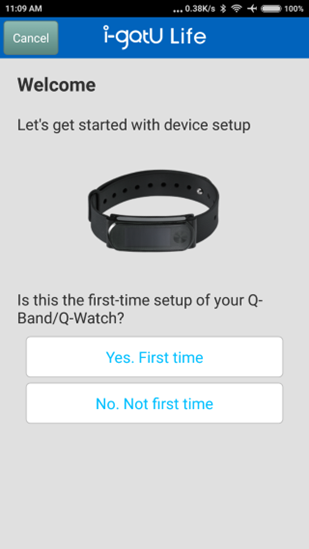
Q1: How to install the Q-Band ?
A1:
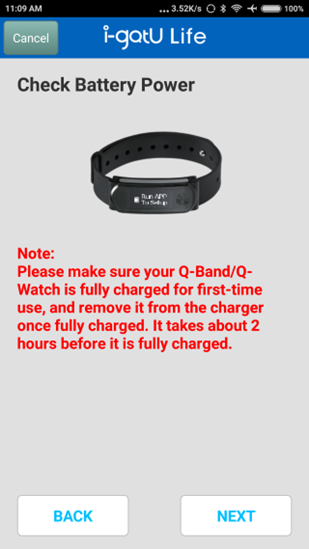
1). Please make sure your Q-Band device is fully charged via USB Charging box when you use it for the first time. It takes about 3 hours before it is fully charged.
Q-Band device has power protective design before the first time connection. It has to be fully charged, otherwise it cannot turn on and normally use.2). If you are using Android phone, Q-Band does support Android 4.4 and above version. Please download i-gotU Life app from Google Play.
If you are using iPhone, Q-Band does support iPhone 5 and above phones / iOS 10 and above version. Please download i-gotU Life app from App Store.
• Please click here to see the Compatible devices.After that, please open i-gotU Life app and follow the Setup Wizard to pair via BLE and input your basic personal information.
Note:
1. If your phone Bluetooth cannot find Q-Band device, please click the Q-Band device button once and then back to App and scan again. If it still does not find anything , please try to reset the Q-Band device, please refer to the FAQ > Product operation > Q1 to reset your Q-band device.
2. Q-Band will connect to server and check the firmware version when the Q-Band has first connected with phone successfully, please make sure Wi-Fi or mobile network of your phone has been turned on.3). After finishing your basic personal information setting, i-gotU Life will download, analyze and sync data with your Q-Band device.
Please refer to the link below for the complete installation instruction:
For Android user:http://global.mobileaction.com/support/sub-Q-68/Q68_connection.Android.htm
For iPhone user: http://global.mobileaction.com/support/sub-Q-68/Q68_connection.iOS.htm
-
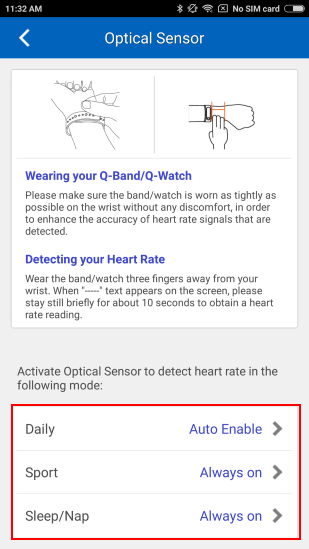
Q2: How to detect your heart rate correctly on the Q-Band?
A2:
Please refer to the following steps or video to detect your heart rate correctly.
Video link: https://youtu.be/fFNA4F3tOqI(1). Tap the Life icon on the upper left corner to enter I gotU Life app function, select “Workout”, then select “Optical Sensor” on the option of Heart Rate Sensor.
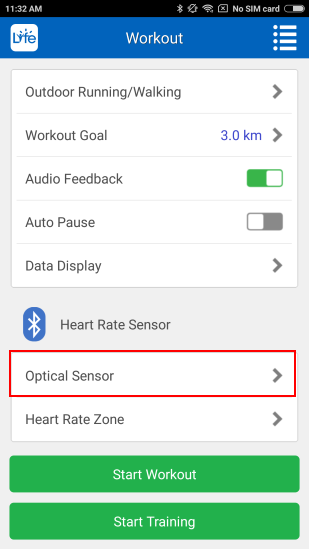
(2). In the option of Heart Rate Sensor, please refer to instruction to wear Q-Band, and select which mode you want to activate the optical sensor.

(3). Please refer to the following steps to wear on Q-Band and detect your heart rate:
Step 1:
Wear Q-Band on your wrist, then spare the space for about 1 finger width between the strap and your wrist.

Step 2:
Please adjust the position above the wrist for 3 fingers, and make sure Q-Band is worn as tight as possible on the wrist.
In order to enhance the accuracy of heart rate signals that are detected.Note:
Optical Sensor uses PPG( Photoplethysmography) technology to detect, PPG is an optically obtained plethysmogram, a volumetric measurement of an organ.
And user should wear on the position of the capillary concentrated distribution area.
Suggestion to wear above the wrist for 3 fingers, the heart rate detection will be more accurate.

Step 3:
1). Detect heart rate in Sports Mode:
Switch Q-Band to Sports mode, it will need for 10 seconds to scan, then will appear the heart rate value.
If you want to stop detecting heart rate, please switch the Sports mode to Daily mode.


2). Detect heart rate in Daily Mode:
In daily mode, you can tap the button to switch the display screen to heart rate detection screen.Note: If you would like to stop the heart rate detection, please tap the button to other display screen to stop the heart rate detection.

3). Detect heart rate in Sleep/Nap Mode:
Please switch your Q-Band to Sleep or Nap mode to detect your heart rate.
If you have set the [Device Auto Sleep] to detect your sleep status, the Q-Band heart rate detection function will be automatically turned on before 1 hour of the start time that you set.
Example:
If you have set start time at 22:00, end time 06:00, the heart rate detection function will be automatically turned on at 21:00.
-
Q3: How to wear your Q-Band?
A3:
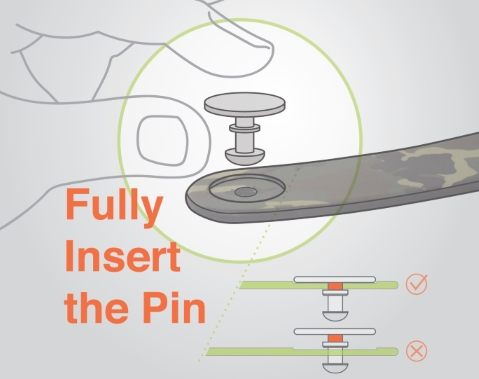
1). Insert the new bands into the slots on both sides of the core.

2). Make sure the clasp has inserted the pin fully.
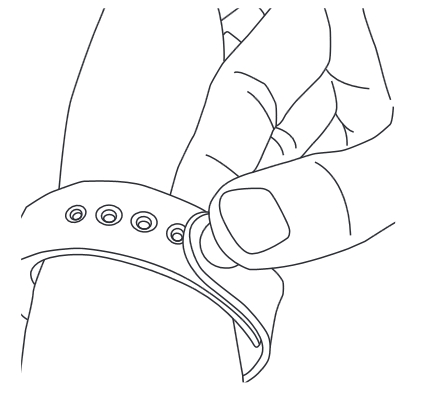
3). Put on the wristband with the screen facing up and the band wrapped around your wrist.
Slide one band through the loop of the other band, and align the clasp along the band to find the hole where best fit the clasp.
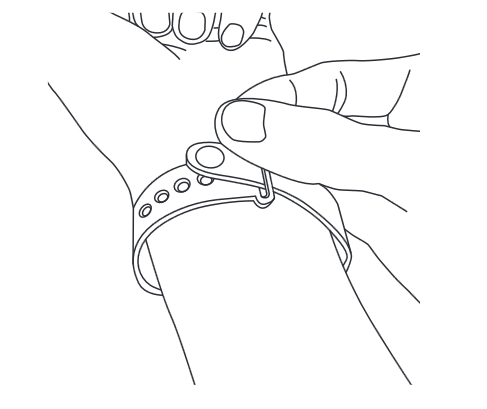
4). Squeeze the clasp into the hole on the wristband until you hear a click, indicating the band is securely fastened.
You can also refer to the video to wear your Q-Band device: https://www.youtube.com/watch?v=WYjiEpdvWzw
-
Q4: How to add cared one on i-CareU Life APP?
A4:
Please refer to the following steps and pictures:
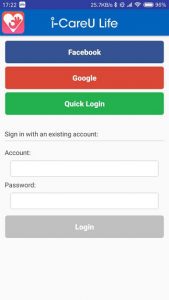
1.)Please activate i-CareU Life APP on your smartphone, you could sign in the APP by
[ Quick Login ] 、 [ Google account ] or [ Facebook account ] .※You could sign in with the [ existing account ] . If you sign in with [ Quick Login ] , you will get an individual account and the password. By inputting the existing account and the password, it could assist you to sign in i-CareU Life APP again.
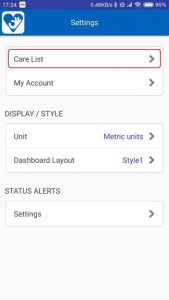
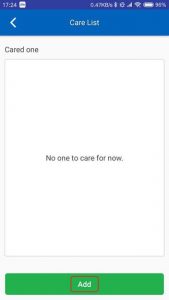
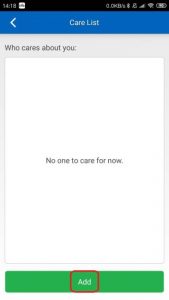
2.)Please tap the heart icon at the upper left corner to open function menu > [ Setting ] > [ Care List ].

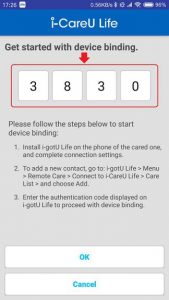
3.)Tap [ Add ] button > Go to [ Get started with device binding ] page.
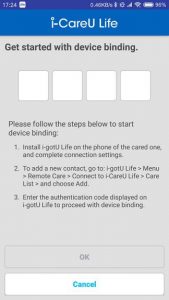
4.)Request your caring family and friends to activate i-gotU Life APP > Tap the life icon at the upper left corner to open function menu > [ Remote Care ] > [ Care List ] > Tap [ Add ] button > Get the [ 4 numbers authentication code ].


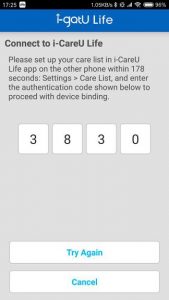
5.)Please enter the [ 4 numbers authentication code ] to i-CareU Life APP [ Get started with device binding ] page within 180 seconds then tap [ OK ] to proceed with device binding, “ when i-CareU Life setup is complete ” message show up, tap [ Complete ] to finish the device binding procedure.
※Please make sure that i-gotU Life APP has updated to the latest version before proceeding with the device binding procedure.
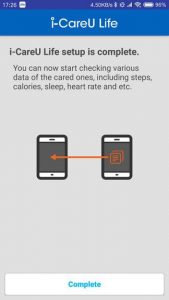
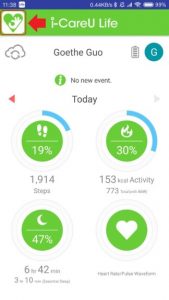
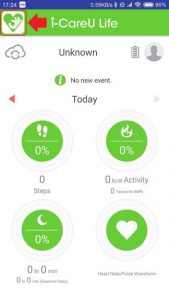
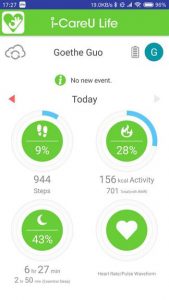
6.)Cared one will show on the Care List when device binding procedure is complete-finished. (By tapping the arrow icon you could confirm to unbind the cared one of device on the Care List.) Then go back to [ Dashboard ] , you could start to remotely care the cared one's health information.

Contact us